Importing From A Standard Spreadsheet
Note: These instructions are for 'Flat File' importing.
Before reading this section, please read though some of the guidelines for importing in How Does Importing Work?. These are essential to prevent problems with the import. You may also want to check the full list of available fields to import in Valid Fields For Importing.
When you have a file ready to import, go to 'File | Import.' this starts the 'Import Wizard'.
First Wizard Screen
Select 'Flat file import' and then press 'Next' when ready.
Hierarchical importing is discussed in What Is A Hierarchical File?.
Second Wizard Screen
The settings within this window are described below:
|
Field |
Meaning |
|
File Name |
Select the name of the file that has been prepared for import. Use the 'Browse' button if necessary to search for the file. Note that if the file is open in another application (such as Excel) then the Import Wizard may not be able to open it. |
|
Do you wish to update or replace your existing data? |
Select whether you wish to update or replace the current store contents. Update will add the new sections and products into the current store. You can also update specific fields within a product - see Updating Existing Products Via An Import. Replace will overwrite the entire store with the imported data. |
|
What type of file do you want to import? |
Specify whether the file you are importing is comma-delimited or tab-delimited (whether the fields are separated by commas or tabs). If your file has an extension of *.csv then it is comma-delimited. If you are not sure, then open your file with 'Notepad' to check. |
|
What character set was used to create the file? |
Specify whether the character set is from ANSI (Windows applications) or DOS (older DOS or Apple Mac applications). Your file will almost definitely be 'ANSI'. |
|
Does the first record contain field names (in which case it will not be imported)? |
Specify whether or not the first row of your data contains the column headings (field names). This field is unavailable if you are importing a hierarchical file - see What Is A Hierarchical File?. |
Press 'Next' to move on to the next screen.
Third Wizard Screen
This is the mapping screen where the field names (column headings) in your data file need to be matched up with (mapped onto) Actinic's field names. For a description of all these Actinic field names, please go to Valid Fields For Importing.
If you have given field names in your source file then these will be displayed in the 'Import Field' column. If your source file had no field names, then Import Wizard will automatically label each field it finds as 'Field 0', 'Field 1', 'Field 2', etc.
When it reads your file, Actinic will attempt to map as many fields as it can. The fields which have been successfully mapped will be shown in the central column, and have a blue tick against them in the left-hand column. This auto-mapping may not be correct, so it is advisable to check that you are satisfied with the result.
If you have a red question mark against the field then you need to manually map the field. To map any remaining fields you must:
1. Click and hold the mouse button down on one of your import file's field names (in the 'Import Field' column) and drag it into a cell in the 'Map Import Field' column next to the equivalent field in the 'To Actinic Field' column. Then release the button. Alternatively, use standard copy and paste [Ctrl+C] and [Ctrl+V] to move fields into the middle column.
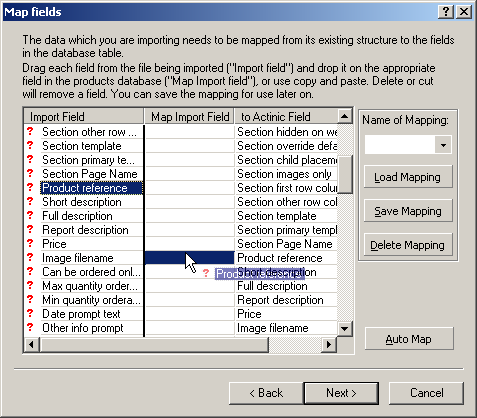
2. The completed linked field will then appear in the central column. Once it has been mapped onto an Actinic field, the red question mark is replaced by a blue tick.
3. A value in the 'Import Field' column can be mapped to several 'Actinic Field' values. For example, you may require the imported short description field to map to both the 'Short Description' and 'Full Description' fields.
4. Fields in the 'Map Import Field' column can also be moved around within this column.
Once the mapping is complete, it can be saved for future use. Type a name in the 'Name of Mapping' field and then click the 'Save Mapping' button.
You can then click 'Load Mapping' when you are importing a similar sort of data. You can also delete mappings with the 'Delete Mapping' button.
Click 'Next' to continue. If you get a warning about currency, you can just click 'OK'.
Fourth Wizard Screen
The final screen of the Import Wizard deals with the possibility of errors in the import.
In order to display any errors you must:
1. Select the 'Make a list of lines that fail to import?' field to request an error list. This is recommended, as if the import is unsuccessful then the cause of any errors can be viewed at your convenience, otherwise you will not know why the import failed.
2. Choose a file name for the error list. This can be a new file or an existing file. Use the Browse button if necessary. If the file you specified for the errors list already exists then you will be asked if you wish to over-write it. Select Yes or No as required.
Click the 'Finish' button at the bottom of the page to proceed with the import.
The 'Import Wizard' will then proceed with the import and display a summary of the imported products. If errors occur then select the 'View Errors' button.
Your new products will now be in the Actinic content tree.