Editing Layouts
Layouts are small pieces of HTML that fit together to create the store pages within Actinic. A general overview of layouts is in What Is A Layout?.
Layouts can be edited from the 'Design' tab.
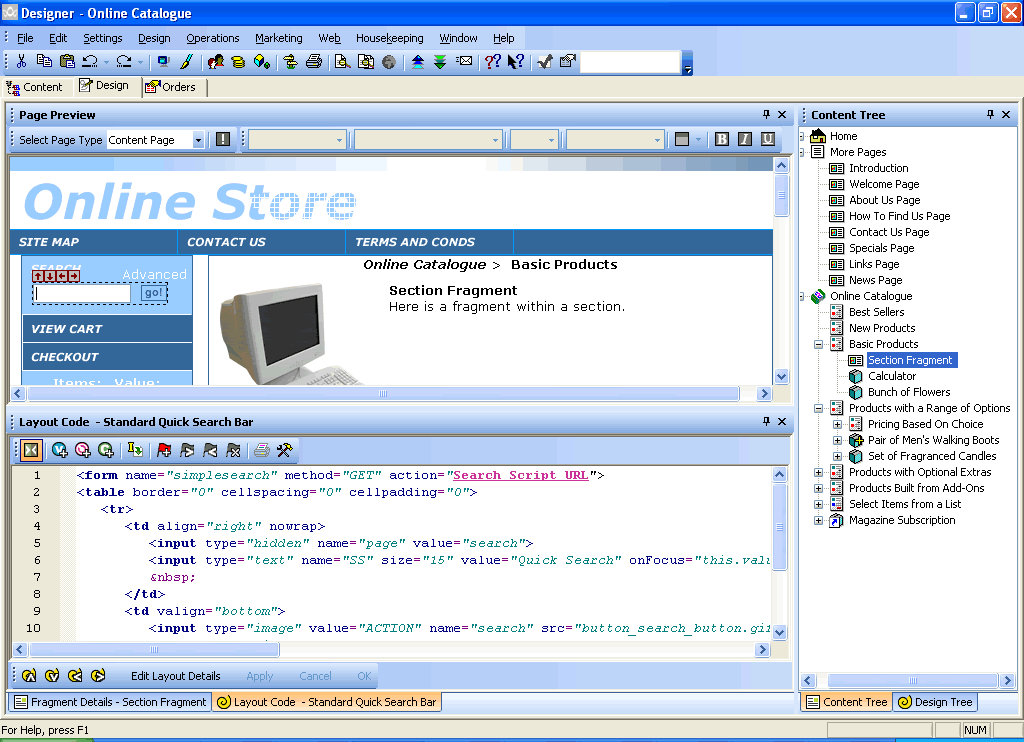
The Design tab is divided into three parts.
· An interactive preview that you can use to select items to change the look of.
· A panel at the bottom that contains a 'Layout Code' tab and a 'Details' tab. You can change between the tabs at the bottom of the panel.
· A vertical panel at the right that contains a 'Content Tree' tab and a 'Design Tree' tab. You can change between the tabs at the bottom of the panel. The Content Tree tab just allows you to change the page you are looking at without having to leave the Design tab.
You can use the preview with the Layout Code tab as follows:
1. Click on any item, and at the bottom of the tab you will see the 'Layout Code' (i.e. the HTML) that is responsible for laying out the item you have selected in the preview. You have now selected the layout for editing.
Sometimes the alignment of text in the preview changes when you select an item in the preview. This is a normal side-effect of the interactive preview.
2. The name of the layout appears in the title bar of the layout code area.
3. You can make changes to the code of the layout in the 'Layout Code' tab and click 'Apply' to immediately see the effect in the preview.
4. Click 'Undo' (from the main toolbar) to undo any changes you have made, and click 'Redo' to re-apply any changes you have made. You can also select 'Undo' and 'Redo' from the right-click menu.
You can also access the Actinic layouts via the 'Library' (Using The Library)
If you'd rather create a new layout to edit, rather than editing an existing one, then follow the instructions in Choosing Alternative Layouts in Actinic.
You can also edit layouts using Dreamweaver. See Editing any Layout in Dreamweaver for more details.
As well as the HTML for the layout, you will also see the following:

Text Variables - these are replaced by values from Actinic. To find about a bit more what each one means, move your mouse over it. More details on variables can be found in Adding A New Variable.
Layout Selectors - these are used to include other layouts into the overall page layout (such as a company logo, or a best seller list etc.). These will either appear as the name of the layout selector, or the name of the layout that the selector is inserting. For more details about layout selectors, go to Using Layout Selectors.
Block Tags - these are conditional tags that will show or hide the content between them, based on the settings in your store. For more details about block tags, see Inserting Conditions.
The Preview Toolbar
The toolbar that runs along the top of the preview is called the 'Preview Toolbar'.
5. The first control is the 'Page Selection' drop down, which is used to select a different page to edit. This is discussed in Editing Other Actinic Pages.
6. The 'Coding Errors' button next to it will become active if there is a problem in the current page that might affect the design. More details are in Coding Errors.
All the other controls on the toolbar are used to format the appearance of the variables in your design.
Select a variable in your design and try some of the controls out (you can always use 'Undo' to change it back).
· The first drop down allows you to set whether the selected variable is normal text, or a heading. You can then select what sort of heading it is.
· The second drop-down list allows you to change the font of a particular variable. Try and only select one of the more common web fonts such as Arial, Verdana, Times New Roman or Georgia.
· The third drop down allows you to change the font size.
· The fourth drop down allows you to choose a style from 'actinic.css' to use for the variable.
· Finally, there are four buttons allowing you to set the font colour, and also set whether it is bold, italic or underlined.
You can see which of these appearance settings have been applied to a variable by right-clicking on a variable in the layout code and selecting 'Edit Appearance'.
The Layout Toolbar
There is a toolbar along the top of the 'Layout Code' panel. The buttons in this are described below.
|
Icon |
Name |
Description |
|
|
Toggle Basic/Advanced |
'Basic' mode shows variables, layout selectors and block tags as coloured text that is bold and underlined. If you look at 'Advanced' mode, all the underlying code for these items is visible. |
|
|
Insert Variable |
Inserts a new text variable into the design. See Using Variables for more details. |
|
|
Insert Layout |
Inserts a new layout selector into the design. See Using Layout Selectors for more details. |
|
|
Insert Block If |
Inserts a new 'block tag' into the design. See Using Conditions And Block Tags for more details. |
|
|
Insert Inner Page Layout |
Use this when editing Overall Page Layouts to insert the 'INNERLAYOUT' variable into the design. |
|
|
Insert Bookmark |
A bookmark allows you to mark your code so you can find your place again quickly. This button will insert a new bookmark. |
|
|
Next Bookmark |
Goes to the next bookmark within your layout. |
|
|
Previous Bookmark |
Goes to the previous bookmark within your layout. |
|
|
Clear All Bookmarks |
Removes all bookmarks from the current layout. |
|
|
|
Prints the layout to a printer. |
|
|
Configuration |
Described in Advanced Layout Editing Options. |


Navigating the Preview
Sometimes when you click an item in the preview, the layout that is selected will actually be 'within' the layout you really need to edit.
When this happens, click either the  icon on the box around the layout, or click
the
icon on the box around the layout, or click
the  icon on the toolbar underneath the
layout code.
icon on the toolbar underneath the
layout code.
If you want to see how the layouts all fit together, so you can see how layouts fit within other layouts, then you can look at the 'Design Tree' in the right-hand panel. See The Design Tree for an explanation.
Similarly, the other arrow icons can be used to navigate the preview:
 and
and  will take you into the first variable or
layout selector within the current layout.
will take you into the first variable or
layout selector within the current layout.
 and
and  will take you to the previous variable or
layout selector in the current layout, or the next item in the current list.
will take you to the previous variable or
layout selector in the current layout, or the next item in the current list.
 and
and  will take you to the next variable or layout
selector in the current layout, or the previous item in the current list.
will take you to the next variable or layout
selector in the current layout, or the previous item in the current list.
Lists are explained in Content List Overview.